Finding the Orb Zone

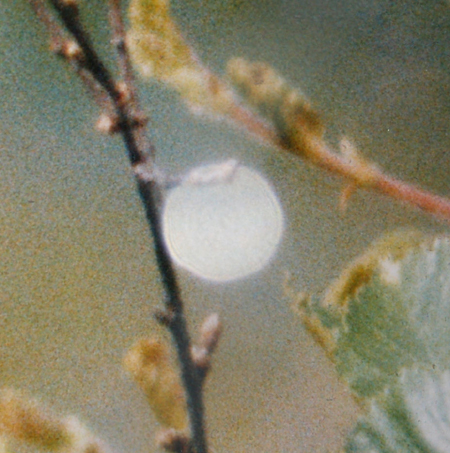
At first glance, this photo appears to show an orb behind a bud which is attached to a twig. However, this is definitely not the case. That’s because the twig is, in fact, part of a large photograph! The orb is real, inasmuch as it is in front of the picture of the twig. However, it is very close to the lens and the bud is showing through the orb which is translucent. If you look closely, you’ll see that the pale orb colours are superimposed over the bud.
Defining the orb zone
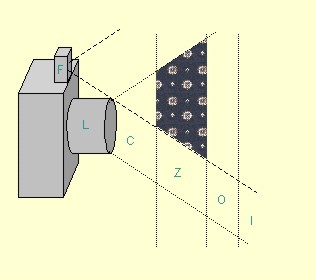
The strange object on the left is supposed to be a camera! The vertical lines define zones of increasing distances from the camera (going right). They are explained left. The subject of the photo is off the right-hand side. The orb zone itself is the shaded area with ‘orbs’ in it!
Picturing the orb zone
The diagram (above) is an attempt to show where the orb zone is in space. CC is circle of confusion. The key is: ‘F’ flash unit, ‘L’ camera lens, ‘C’ area where CCs are too diffuse to show up, ‘Z’ area where CCs can show up in flash light, ‘O’ area where CCs occur but are too far from the flash to become orbs, ‘I’ area where objects are in focus so CCs do not appear. The area between the line with long (diagonal) dashes is illuminated by the flash. The area between the (diagonal) lines with short dashes is the area visible to the lens (the frame).
It is possible the areas ‘C’ or ‘O’, or both, may not exist in some camera models (so that the orb zone stretches right from the camera to where objects are in focus).
The orb zone will move about from picture to picture. This is because the depth of field (which determines the boundary between ‘O’ and ‘I’ areas) will vary from shot to shot. This is particularly true of modern automatic cameras where users control few of the relevant variables.
Note that orbs may not occur low in the frame in some cameras because the lens barrel shades objects from the flash (the area around the letter ‘Z’).
Orbs behind objects
The interest in orbs is seemingly never ending (just look around the web), despite the fact that most serious researchers accept that they are photographic artifacts. Despite this, there a steady stream of photos put forward by people to ‘prove’ that orbs are paranormal, or at least not mere bits of dust.
One common theme is the idea that an orb is not close to the camera lens but ‘out there’, inside the main body of the picture. Photos are frequently produced that appear to show objects in front of orbs. In the picture on the left, an orb appears to ‘resting’ on a twig with a bud in front of it.
The most important thing to remember when looking at such photos is that circles of confusion (which is what orbs are) vary from opaque, through translucent to transparent. So objects that appear to be in front of the orb, by a lucky chance of perspective, are in fact behind. Bits of orbs can apparently disappear in front of dark, light or highly saturated colours because digital cameras have a smaller latitude (ability to show detail in dark or light areas) compared to film.
Finding your orb zone
So where is the ‘orb zone’ for your camera? The bad news is, it varies from camera to camera and even from photo to photo!
The orb zone is the area in space in front of a camera where objects are close enough to produce circles of confusion that can be lit by the flash unit to produce orbs. Its exact position and extent depends on:
- the distance of the flash unit from the camera lens
- the power of the flash unit
- duration of flash (determined automatically by camera)
- the depth of field (DOF) of the lens
Unfortunately, it’s not even that simple. That’s because the depth of field, in turn, depends on these further factors:
- the focal length of the lens
- the f-stop number used
- the distance of the subject from the lens
So, as you can see it is pretty complicated! There are DOF calculators that can help you with that bit. You just plug in the relevant EXIF information to find the nearest distance that is in focus. But that only provides an outer limit to the orb zone (the boundary between ‘O’ and ‘I’ in the diagram left).
To actually define the zone exactly you may need to experiment. Try a small shiny object just in front of the lens to produce circles of confusion. Use it to find the extent of the zone (‘Z’ in the diagram).
All photos reproductions
All the photos in this anomalous photo section of the ASSAP web site (except the barrel, mirage and digitally manipulated shots) are reproductions, rather than photos received. They demonstrate how one can reproduce photographic anomalies in natural conditions with normal photography.