How to take great orb pictures

Manipulating orb intensity
In the sequence of photos below, the f-stop, lens focal length and ISO settings were held constant. The distance of the orbing object from the camera was also constant. The only variable was the distance of the camera from the subject (wood).
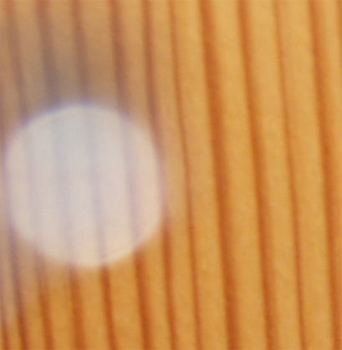
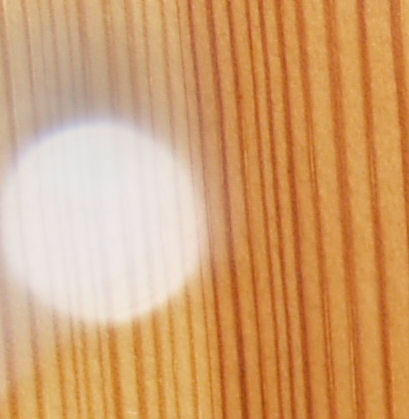

Changing the subject distance has the effect of moving the 'nearest point in-focus' further away. Thus, effectively, the orb zone expands. The effect is to change the size of the orb (it grows bigger), as you can see. Although the orbing object hasn't moved physically with respect to the camera, it is in a different area of the orb zone where the orbs produced are bigger (see diagram above).
The orb also gets brighter (and more opaque - see 'transparency', right) with increasing subject distance. This, however, is because the flash duration is automatically increased by the camera as it gets further from the subject. The flash needs to go on for longer to achieve adequate illumination of the subject. The camera calculates the flash needed by, for instance, using a pre-flash of known power and measuring the light reflected. It then adjusts the flash duration with a device called a thyristor.
How an orb is made
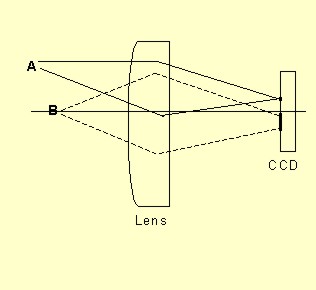
To understand how to photograph an orb you need to know how it forms. The diagram above shows a camera with a single lens projecting an image onto a CCD (the chip that records pictures). In front of the lens there are two tiny points of light. The one labeled 'A' is far enough from the lens to be in focus. The continuous lines show how a sharp point image of 'A' is formed on the CCD. The point 'B', however, is too close to the camera to be in focus. As a result, the dotted lines show how it becomes spread-out on the CCD, even though 'B' is just a point source of light. This spread-out image is a circle of confusion. This is sometimes called an orb by paranormal researchers, particularly when it appears on photographs taken at haunted places.
Equipment
The digital camera is the equipment of choice for producing good orb pictures. Although film cameras can produce orbs, it's a lot more difficult. The reason the digital camera is so much better is that it uses much short focal length lenses. Typical focal lengths for digital cameras are less than half those for film cameras. This reduced focal length brings the 'orb zone' closer to the flash unit which is critical for decent orbs. You can get pictures of daylight orbs but they tend to be rather faint. Usually, you'll need to use flash for decent orb photos.
Orb size and brightness
Orbs are larger when created by objects closer to the flash. However, this can mean that they also become dimmer. It is difficult to control the size of orbs since you cannot control the exact position of the orbing particles.
To get the brightest orbs, stand well away from the subject of your photo (that's the wall of the haunted room, not the dust!). This will force the automatic flash to go for a longer duration and so make the orbs brighter (photos left). Orbs pictured outside are often particularly bright for this reason (subjects are distant outside).
Orb shapes
The classic circular shape of orbs is derived from circle of confusion modified by the shape of the aperture in your camera lens. For most cameras the aperture is so near to circular that all your orbs will appear circular. For some cameras, however, the lens aperture might be hexagonal or even diamond-shaped. You will find that all the orbs taken with such a camera will appear the same odd shape. Just how pronounced this diamond or hexagonal shape may vary from shot to shot, depending on how wide the aperture is (the f-stop). The odd shape might even vanish altogether very rarely These odd-shaped orbs demonstrate that orbs are caused by the camera and not the environment.
Other shapes can arise from orbs overlapping but they are always derived from different arrangements of the basic orb shape. This, again, implies a photographic artifact rather than an external object.
Applying science to orbs
The Orb Zone Theory presents a case study of how the scientific method can be applied to paranormal phenomena.
Orb material
Many people prefer 'authentic' orbs, which are those found in allegedly haunted locations. This is all very well but it is very hit and miss. You might spend an entire vigil flashing away and not got a single orb!
It is much easier is to provide the orb material yourself. You need to prepare the location as it can get messy. It is best to arrange for a fairly dark background so that the orbs show up better. If you're going to be throwing powder around or using a spray, make sure you protect surfaces from the fall-out. In particular, do take care that particulate matter doesn't get into your camera where it could cause damage.
The basic idea is to drop or spray small particles close in front of the lens of the camera while taking flash pictures of an object beyond. This should yield orbs. Various solids (like flour, cinnamon, etc) can produce some pleasing, typical-looking orbs. However, there is little doubt that the best orbs are produced by water droplets. That's because they introduce refraction effects that can be spectacular.
Numbers of orbs
Clearly the number of orbs you get is influenced by how many suitable particles are in the orb zone at the time of exposure. However, if you go for brighter orbs (left) you will get more as well. That's because orbs too faint to be seen before, will be illuminated when there is more light.
Orb transparency
Curiously enough, all orbs can be transparent, even if they are not produced by water droplets. That's because the orbs are produced by a point light source so the material it is coming from makes little difference.
Instead, transparency depends on the level of illumination. Essentially, faint orbs are transparent and bright ones opaque. That's because the brighter orbs blot out any image from behind so it never reaches the CCD.
Orb colours
Orb colour generally varies between pale white or grey (transparent) and brilliant white (opaque) depending on brightness. It rarely reflects the colour of the material that produced it. Some water orbs can have a faint blue hue. This is probably a refraction effect. Rainbow colour effects are produced by chromatic aberration in the camera lens, moire patterns or refraction in water orbs.
Sometimes moire patterns can turn an entire orb one colour. The patterns can be removed in photo software.
Some orbs may become coloured because of white balance 'drift' in the camera. This depends on what's in the frame when the photo is taken.